

Photography, as they say, is about capturing a moment in time. Some moments are a fraction of a second, like a batter swinging for the fences, or a Kingfisher as it dives for its breakfast. Other moments might capture a full second of time, such as a waterfall flowing over Niagara Falls. Some moments are longer yet, such as letting light flow through the camera long enough to capture eddies in a river, or soften a raging surf into a misty fog. When you start dragging out the length of shots longer and longer, you stop capturing a moment as the eye can see it, and begin to show what the mind can only imagine. Star trail photography takes that concept of dragging out a lengthy shutter speed to the extreme – lengths of time ranging from tens of minutes to multiples of hours to capture just one final photo. And while the results can be amazing, it can also test the limits of your patience both on location as well as back home at the editing screen.
The Concept
One of the most amazing things about star trail photography is that it captures movement that truly is too slow for the naked eye to really calculate. If you’re taking photos of the milky way over the course of the night, you’ll soon be in amazement of just how fast the stars move, yet when you sit there looking, trying to detect their moment, its nearly impossible without a strong reference point such as a tall tree or pole, or God forbid, a building filled with lights that will drown out much of the stars you are trying to see. But move they do, and in a span of as little as 20-30 minutes you can get a shot that will show more than just a blurry star, but a true path of stars across the night sky.
But here, is our first hurtle we must cross. How to capture a single photo over the span of 20 minutes or longer. Even the best modern DSLR cameras have limits to how long a single shot can gather light before the sensor starts to heat up and color noise begins to degrade the image. The very thought of ultra-long exposure shots sends shivers up my spine and memories of shots ruined in Grand Teton National Park when I tried to run single frames of over 8 minutes. The answer, simply, is to cheat. We do not attempt to take a single photo over the entire time frame, but capture one photo every 30 seconds, one immediately after one another, for as long as we can sit still and wait. Then, with through the magic of Photoshop or other star-stacking software, merge all of our many many photos together until the race across the sky is revealed.
The Setup
Unlike capturing the Milky Way Galaxy, where you have a very limited amount of time to capture as much light as possible before the very movement of the stars ruins the shot, star trail photography is a fair bit less demanding on your gear, meaning that even the kit lens on a digital Rebel or Nikon d3XXX series can be used right along side a Full Frame DSLR with ultra-wide prime lenses with at least similar (though admittedly not identical) results. If it wasn’t for the fact you basically sit on your hands for a rather long period of time for a single photo, it would be the perfect introduction to night photography. Thankfully, that wait can be made a lot easier with a few good friends, a good pillow to rest on, or even a book to read while you listen to the frames rattle off on your camera.
What you’ll need is:
- Camera capable of using a remote shutter release that can be locked down or intervalometer (see note below) that can be set to manual exposure.
- Sturdy Tripod – I dare you hand hold your camera for 30 minutes
- Remote shutter release / intervalometer – Note: some cameras need to be set to a 1 sec pause between frames, others can simply have their shutter release locked down for continuous frames.
- A memory card with room for at minimum 50 photos
- A fully charged battery!
The only other thing you need is somewhere dark to take your star trails. For most of us, this means driving out into the middle of no where, away from anything resembling cities or even small towns. I use websites such as Dark Sky Finder to find for the best possible regions to scout for locations. I know I’ve said it in other articles, but it bears repeating, the night sky really isn’t your subject in astrophotography. Most of the rules that make for great landscape photography still apply. You need a compelling subject, or at least in this case a compelling foreground to take your photo from ‘wow, what are those streaks in the sky’ to ‘wow, that’s something I’d love to hang in my home / office / tell every friend I know about / share across the Internets and make you famous for a day.
Then you just wait for that night with clear skies. And I mean really clear skies. While Milky Way shots can be enhanced with some interesting cloud formations, clouds truly are the enemy of star trail photography. Blurs of lighter skies and obscured stars can ruin the effect of a star trail you’ve spent a great deal of time to capture.
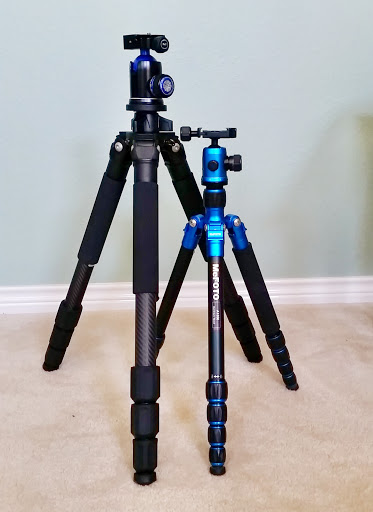
Below (left to right):
1) My two tripods, the bigger and sturdier Induro CLT304L purchased specifically for night time photography when the camera needs to be perfectly still for 30 seconds or longer.
2) A simple remote shutter release might work, but some cameras, and perhaps even some cards, might not be fast enough to run back to back photos immediately.
3) If you need that short pause, use an intervalometer, or see if your camera has such functionality built in!


360 Degrees of Unique
You’ve got your gear, you’ve got your dark skies, you’ve got your clear skies, how do you decide what direction to shoot? To me, the best answer to this question is not found by looking at the sky, but instead determined by your options for foreground. You did read what I said above about the sky not being your subject right? Yeah, I wasn’t joking. Okay, so let’s pretend for a moment you’ve got a giant field to work with and a perfectly symmetrical tower you want to use as your subject so you have complete control over what direction you want to shoot. In this case, it comes down to what kind of star movement you want to have in your sky.
North:
When most people think about star trails, they think of circles of stars rotating around in ever growing rings. For this look you will need to be shooting to the north. In the middle of those circles you will find Polaris, also known as the North Star. Find Polaris and you’ll know exactly where the middle of those circles will be.

North Facing Trails at Pedernales Falls State Park
South:
In my opinion, south facing star trails are the most boring, broad lazy arches of star movement. Unless you’re running a sequence of shots for a Milky Way time lapse and you decide to make dual-use of these hundreds of frames for a star trail as well, I’d try to find other compositions with a more compelling star look.

Generally south facing view, the closest example I’ve got.
East/West:
Splitting the difference between the northern tight circles and the southern facing arches, quite literally, the East/West star trails gives you a piece of both with the transition zone in between. This is actually one of my favorite looks and since you can get more or less the same look (though mirrored) facing either the east or west gives you double the options for capturing this look compared to just focusing on the north.

Looking West-Southwest at Ft. Griffin
The great news is that you really have 360 degrees of variation, and with different focal lengths, you capture different segments of these looks. The result – nearly endless permutations of sky to set above your foreground. With more experience (or at least research of other star trail photos) you will come to understand how to setup the look you want to capture.

14mm focal length taken at the same time as the 28mm version seen in the Featured Photo.
Processing
Star Trail photography truly is one of those techniques that not only need but require post processing to put it all together. You come home after being up half the night with a memory card half full of photos, but all those photos will have to be put all together to make just one (or maybe a couple) finished photos.
I organize all my photo editing in Lightroom as that is what I use for photo organization and uploading. As always I start with general photo edits, lens correction, adjusting the horizon, white balance, and the like. For star trails, I usually boost the contrast a little so that the bigger stars show up clearly and the smaller stars fade into the background. This means that the big bold stars will make up your trails will pop against a nice dark sky.
To merge your photos into a single frame, you have a number of options. Option 1 is to use a star stacking program such as StarStax, or you can take a more manual approach in Photoshop to do the blending. I discussed some of the advantages and disadvantages of both in a recent post Star Trail Stacking in Photoshop CC – the fast way. StarStax and other programs will deal with the small gaps between the star trails in each frame for you, and automate many of the more time consuming steps.
Over the span of 20-90+ minutes, its not just the stars that are going to do some moving. Plants, lights, all sorts of things are likely going to be making a mess of your foreground unless (and perhaps even if) your foreground is a dark silhouette. Once your stack is finished, you’re likely going to want to replace your foreground from a single frame or a couple of frames for light painting, etc.
Once you have your foreground and skies blended together, process as you would any other landscape photo to your taste. For specific examples and processing step-by-step, check out my article on my star trail photos out at Tyler State Park and Pedernales Falls State Park.
Comments
Pingback: Astrophotography – Seeing the Light in the Darkest Places | Fischer Photography