

You’ve planned your photography trip for weeks, maybe even months, you’ve picked the best time of year for the location, or the skies, or the tides, or whatever it is you want to capture at some far away location. Taking time away from most likely both work and family, you have a list of ‘must have’ photos in your mind of what you want to shoot when you get there for the trip to be a success. There is, however, one thing you can’t control, one variable that will, almost without fail throw some sort of a wrench into your best laid plans – Mother Nature. She gives us the amazing skies, the spring blooms and vibrant fall foliage. She also gives us low clouds when trying to shoot the mountains, overcast when we want to see the stars, bight contrasty light when we want to shoot waterfalls, anything and everything that wasn’t in our game plan when we stepped into the great outdoors. But it wouldn’t be the great outdoors if we could control every element down to the placement of the clouds in the sky.
From Tip #10 in my Landscapes 101 article – my mantra for days that don’t go to plan is “Adjust and Adapt”. Be it rain and clouds that hide the majestic mountain peaks or bitter cold winds that drop the leaves from the forest just days before you arrive, or a late frost that keeps the fields of wildflowers looking a bit less than the saturated blanket you wanted, learning to see what you can shoot, seeing the shot in front of you instead of wishing for the shot that isn’t there is going to go a long way to keeping the down days from bringing you down.
In the Wind
Landscape photographers love still wind. First thing in the morning when the light is at its best, but also at some of its dimmest, to allow for low ISO levels, smaller apertures for depth of field, we will end up with longer shutter speeds. Blustery winds make leaves and grasses sway, ruins reflections on the lakes, finds the limits of stability of smaller tripods, cold winds chill the photographer much more than the temperature would otherwise, and any dust in the air now has a much higher chance of ending up inside the camera during lens changes.
Option 1: Find shelter. Might seem obvious, but unless you’re in the Great Plains chasing storms, there is likely going to be somewhere you can get setup where winds won’t be as powerful so your tripod and your fingers don’t feel the wind’s effects nearly as much. On a recent trip to Eisenhower State Park my plan was to shoot along the store line doing long exposures. Normally I would have welcomed wind, but on this day a strong cold front had just hit that I hadn’t counted on and instead of being in the upper 60’s it was already in the 40’s. Leaving the shoreline for the shelter of the woods meant I could shoot macros in relative calm where my hands were not being subjected to the cold wind.
Option 2: Embrace the movement. Setup for longer exposures, let the blowing winds move fields of wild flowers into an abstract blur of color while clouds race overhead. On the coast you’ll likely have high seas, capture either the drama of the churning water or go long exposure to turn the raging water into soft mist.
Option 3: Find immobile subjects and minimize size of those that do move. Some things are less susceptible to the wind than others. Grasses are on one end of the scale, stone just about as far on the other end as natural landscapes get. Fill your frame with the mountains, with streams that you expect to move, ocean and beaches are good in the wind as long as you can protect your camera from sea spray.

Breezy out in the open, but even delicate spring vines are an option if you can find shelter in the depths of a forest hiking trail
In the Clear
There are few things that Landscape Photographers hate more than clear cloudless skies. Heavy contrast, little visual interest in the sky, these are the days where it’s almost better to head back to town and find the patio of a good brew pub rather than breaking out the camera gear. But you do have options.
Option 1: Wait till nightfall! Oh clear skies, how I wish and pray for you when the sun sets and the stars come out. Astrophotography requires at least mostly if not fully completely clear skies. So go find that brew pub, catch a long nap, and head back out a few hours before sunset to scout your ideal compositions for star trails, Milky Way and more. Clear skies can work during blue hour as well, right after sunset, the sky will start taking on gradients of blues and pinks.
Option 2: Shoot in the open, with the sun to your back, while minimizing the amount of blue sky. Come up with some interesting compositions that put just enough sky in the frame to not feel cramped. When the sun is low on the horizon, stop that lens down and work with sun stars. Just be very careful not to look into the sun through the DSLR view finder, especially with a telephoto lens! Even with these tips, you might need to bracket your photos to ensure you have no blown highlights or clipped shadows.

A few wisps of fog was all that was needed to turn this clear morning into dreamy wonder
In the Overcast
If clear cloudless skies was one of the landscape photographer’s worst nightmares, featureless overcast skies is probably right there neck and neck for the top spot when you want to shoot the big expansive views. Flat skies have no interest nor saturation, and keeping the sky from becoming blown out is extremely difficult. Bracketing to fix that just ends up leaving expanses of ugly gray through the image. Not ideal. The saving grace to overcast is that unlike under blue skies, the options are a bit more varied and appealing – not to mention extends the shooting hours for good images through the entire day!
Option 1: Macro! Or at least shoot ‘intimate views’ of nature and landscapes. Put the 16mm back in your bag and pull out the 100mm or 70-200. Overcast skies bring soft even light, minimal to no shadows. Exactly what you want for picking out small views deep in the forest or individual leaves or other macro shots. Just remember to bring your tripod and a reflector – the tripod as you’re not likely to have shutter speeds high enough for hand holding, and the reflector to block wind and/or bounce a little extra light onto your subject.
Option 2: Long Exposure! Waterfalls are the perfect cloudy day subject. Often you’re shooting into a significant elevation change, and if you can get up to near the top of the falls view point you can eliminate the sky entirely from view. The overcast skies reduce light allowing for longer exposures with less need for strong ND filers. Waterfalls look best under soft even lighting, so make the most of it and seek out those falls that are in locations that are rarely in full shadow by natural features alone.

Facing south, these falls would take on a very different feel in harsh light.
In the Cold
I’m a Texan, born and bred, so cold and me don’t exactly get along well. Cold also causes problems for your camera and other essential equipment. Wet tripod legs freeze in place, frost covers your camera and lens, Li-Ion batteries lose charge quickly, and ND filters suddenly become a lot more trouble to work with when wearing thick gloves. If you show up on location expecting 70 degrees and it’s 40 instead, there’s only so much you can do to stay warm unless you were prepared ahead of time (which of course is an entirely other article). But assuming you knew that a late spring snow storm was expected or an early frost might knock your expect fall foliage from the trees earlier than expected, there are a few things to keep in mind.
Option 1: Frost can be your friend! There’s little else that can add a magical element to your macro photography than the first light of morning hitting frost. It won’t hang around long on bright clear (see above) mornings, but the results can be spectacular. Even I will be tempted out of a warm bed and into sub-freezing temps by the thought of frosty crystals shimmering in the light.
Option 2: Few things transform a waterfall more than the depth of winter. Everyone has a photo of Multnomah Falls, even this Texas native, but having seen photos of the falls encased in ice and snow still makes my jaw drop. Just be cautious driving in winter conditions and as always – be prepared!
Option 3: Fog of all sorts and styles. Whenever the temps drop, especially quickly, some elements of the surrounding landscape are not going to change as quickly as the air. Visible water vapor of all sorts can add an amazing amount of drama and interest to your photos. Just as the lake sunrise above, be prepared to find it in interesting and unexpected compositions. If you have a really long telephoto lens with you, might be a good time to go searching for wildlife as well. If your breath is visible, just imagine that of an elk or a bear!

Cold January frost = macro wonderland
One last word or two on cold weather shooting – avoid putting your gear in warm and/or humid conditions before heading out. Where going from the cold A/C to balmy outside in summer makes lenses fog over, the inverse in the winter can cause frost to coat your gear (and in that case it’s NOT your friend!). Your hands, wrists, feet and head – if you can keep those extremities comfortable you’ll be able to focus a lot more on your shot and less on your numb hands – not to mention numb hands doesn’t work tripod controls very well, even less so than thick gloves. If you’re hiking into a location, dress in layers – you’ll be warming up on the hike, but cooling down quickly once you’re not moving as much and shooting. Put wicking layers near your skin – especially wool – to stay as dry and comfortable as possible. Chemical hand warmers in your pockets plus a mid-weight glove that’s warm enough to keep your hands comfortable for moderate lengths of time is a good trade off – heavy gloves that you keep removing to work with your camera and gear don’t do you a lot of good.
In the Heat
Extreme heat, like extreme cold, if unprepared can not only ruin a trip, but it can be threatening to both life and limb. If you’ve already got 2 camera bodies, 5 lenses and a big tripod strapped to your back, you might be tempted to cut back on how much water you’re taking with you on even a short hike into a location – especially if you’re leaving in the early morning hours before dawn. At that time of day temps might be feeling good to you, but even a short hike back to the car can become a long trek to heat exhaustion. Not to mention, it’s kind of difficult to frame up a good composition with sweat dripping in your eyes. What you might not be expecting is where and when it can get uncomfortably warm. Silver Falls State Park near Salem Oregon this year – high temp was in the low 90’s! And it was only early June!
Option 1 – Astrophotography! How better to escape the Texas sun in mid summer than sleeping (or editing) though they day and basking in the star filled sky after dark, and after the heat of the day.
Option 2- shoot for sunrise instead of sunset. If it’s going to be really hot, chances are it’s at least mostly clear, meaning you’re already fighting the ‘In the Clear’ situations. And with summer comes long days, making the idea of shooting both sunrise and sunset and STILL sleeping somewhere in between a little daunting for days on end. If you have to make a choice, opt for sunrise.
Option 3 – get high! No, not literally, but see if there’s anywhere within a ‘reasonable detour’ that has a significant amount of elevation. There’s a reason Death Valley isn’t very enjoyable in August and why it’s much cooler on the rim of the Grand Canyon than down in the depths of the canyon. If you want to shoot during the ‘heat of the day’, shooting at higher elevations will provide cooler highs than in the valley. During my recent trip to the Grand Canyon it was hovering near freezing at the rim which sits above 6000ft elevation, an hour’s drive later, and over 2000ft lower, temps were in the 50’s.

July 31st in central Texas – you’d better believe I’m out after dark
Being able to ‘Adjust and Adapt’ is an extension of ‘Be Prepared’. Knowing what the weather is likely going to be doing before you depart on a trip gives you more flexibility, but also don’t expect the weather to do exactly what the weatherman promised either. Forecasts are often for cities somewhat distant from your actual location. Natural features such as mountains, lakes, up on the canyon rim or down in it’s depths can and will cause weather to be drastically different. Even driving an hour or two in any one direction can turn blue skies into dramatic storms or brilliant sunsets. In the first chapter of Landscapes 201 – Preparing for the Shoot I talked at length about how to be prepared to get the most out of your trip. I hope this article offered a ‘what happens when the best laid plans go out the window’ thought process. Beautiful photography can happen almost anywhere at any time, while we all want the perfect light for every location, that’s simply not going to happen. So think creatively, think artistically, and come home with the unique shot if not the perfect shot.
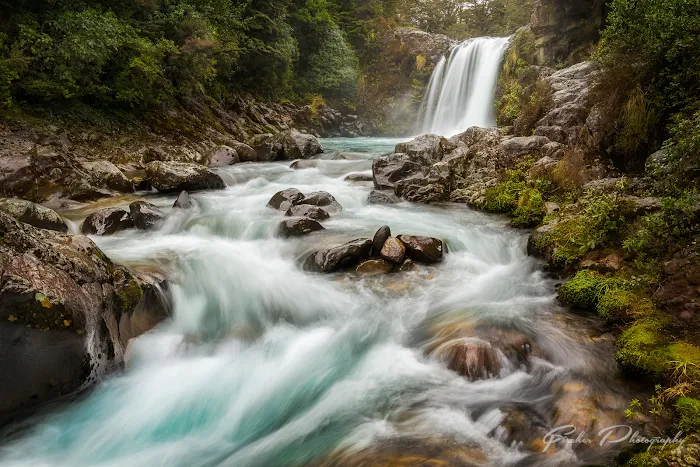
Light rain and flat uninteresting skies hiding the biggest volcanoes in NZ. Went in search of waterfalls instead of mountain peaks. The misty atmosphere added extra sense of depth to this view of Tawhai Falls
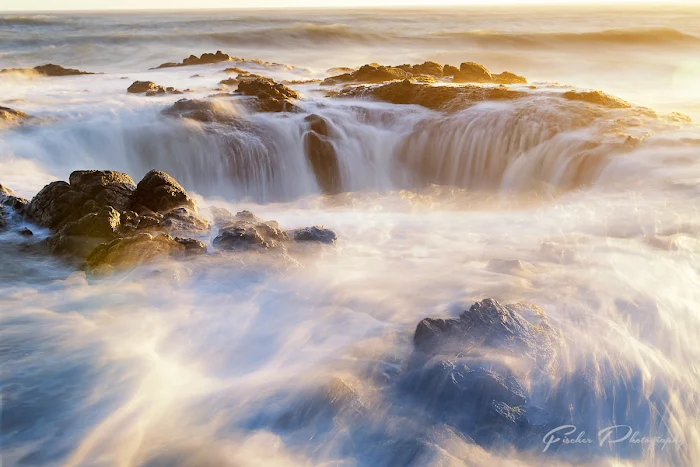
Clear skies with no visual interest meant a short and contrast heavy ‘Golden 15 minutes’. With little time to work I focused on shots that omitted most if not all of the sky and tried to capture as much reflected light in the flowing water around Thor’s Well
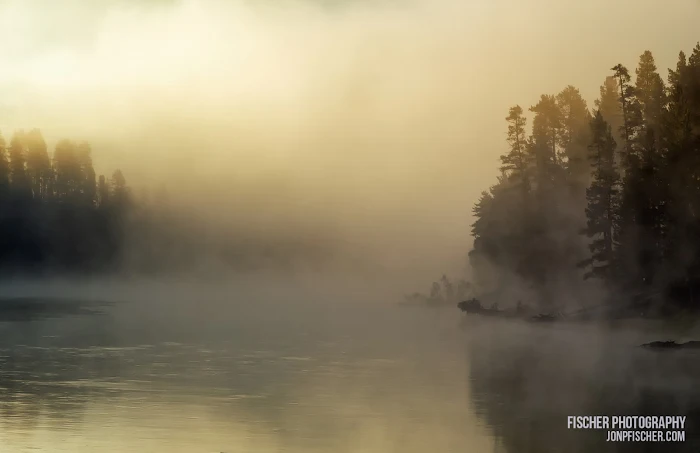
My last morning in Yellowstone I woke to dense fog on a day I had hoped to shoot wildlife in the valley. After several days of clear skies and great views of the thermal features the fog had me bummed. That was, until I passed this view of the Yellowstone River.